Pages

Showing posts with label purses and bags. Show all posts

Monday, October 20, 2014

Burn Out

Yes, again, it has been two weeks. And you know what? I haven't sewed a stitch. I have been feeling completely burnt out these last couple of weeks and in my spare time I have been binge watching Gilmore Girls, crocheting, and playing Wind Waker. Even the thought of stepping into my sewing room was enough to induce a small panic attack. I know I have a lot of stuff I need to do, need to work on. And that's exactly why I have been avoiding it. It's just too much!

So I took a couple of weeks away from sewing. It has been kind of fun, really. Rediscovering how much I love knitting and crochet, for example. Allowing myself to *just* watch TV. That's right, not TV while I sew or TV while I knit. Just TV for the sake of itself. I don't remember the last time I did that. And that seems kind of insane, doesn't it?

hand embroidered drawstring knitting bag
Here is the last thing I sewed. Isn't it cute?
I think part of it is that I have just reached the end of my rope with this nonsense schedule Mario and I are one. We only really see each other 1 day a week and I can't stand it. Not only do I just miss him all the time, but that means we never get anything done on the weekends because we don't want to waste our precious time together doing something lame like pulling weeds or repainting the pergola.

hand embroidered drawstring knitting bag- inside
It even has a zippy pocket! This was such a fun little bag :) 
I need to find a better balance. I have developed a habit of having to be constantly productive. I always have to be making something, reading something, doing something. I haven't been giving myself any time to just sit back, relax, and do what I actually want to do instead of what I feel like I have to do.

So in case you've been wondering, that's where I have been these past couple of weeks. Reassessing my priorities and trying to teach myself how to relax again. I'll keep you posted with how that goes. And maybe show you some of the non-sewing things I've been working on in my time away :)

Monday, September 15, 2014

Around the World Blog Hop

So. The lovely and talented Audrey of Hot Pink Quilts tagged me to join this crazy chain of bloggers answering questions about themselves. I'm really not sure where this started, but it's so fun to see how many people are participating! Seriously, just google Around the World Blog Hop and maybe add quilting and tons of results will pop up! Isn't it amazing just how many of us are tied together in this online quilting and sewing community? I think so! So without further ado...

1.      What am I working on?

rainbow catvent quilt
The Catvent Quilt Along top from last Christmas... Yeah. It's still just a top.

giant churn dash quilt
Mario's quilt also really needs quilting. I still don't even have a backing for it. Definitely need to finish this by Christmas.
Nothing major right now. I have 2 quilt tops I need to finish and turn into quilts. Aiming for the end of the year on those. I've also been working on making more clothes for myself, so expect to see more posts about that in the future. Really, right now I'm coming down from a month of intense, deadline-driven sewing, so I'm taking it a little easy. Just sewing what I want to sew, catching up on bee blocks, and planning for the future. So far, I am enjoying September very much!

sew simple leggings
Some leggings I finished this week.
2.      How does my work differ from others in its genre?

Hmmm. That's a tough one. I have a tendency to do what I want and not care about things like what the pattern tells me to do or worrying about trendy color combos. I try to just make what makes me happy (or what will make the intended recipient happy!) and not worry about anything else. I don't know if that really makes what I do different, but it definitely makes me happy!

elephant swoon blocks
Swoon blocks... still waiting to be sewn together...

mother day dumpling bag gifts
Mother Day Dumpling bags

3.      Why do I write/create what I do?

I create to fill a need. I don't do well with idleness and I find I am the calmest and most satisfied with my life when I am actively working on creating something. What I create can vary widely- I love crafts of all kinds, but I also love writing. Little known fact about me- I studied English and Creative Writing in my undergrad career with an emphasis in poetry. And those poetry workshops were the best classes I took in college. I've loved writing since I was really young. I still have the first book I ever wrote, laminated and spiral bound for the Young Authors program in Washington. Lately my writing hasn't been so regular, but I'm working on that!

So I guess long story short, I create because I love it, because I need to, because it's fun and fulfilling in a way that nothing else is. 

stitch and flip wonky quilt
A wonky wedding quilt I made for a friend
 4.      How does my writing/creating process work?

I think this one is even harder because it really isn't a standard thing. Sometimes I have an idea that I need to make or write RIGHT NOW or the WORLD WILL END. And I get started as soon as I possibly can, taking breaks only for my day job and sleep. But sometimes I have no idea what I want to do, so I just wander around my sewing room or doodle in my journal until I figure something out. Sometimes I work on something a little at a time, sometimes I focus on one thing to completion, sometimes I jump around from project to project. I guess my creative process is just really flexible and sometimes unpredictable. Which suits me just fine.

So now it's my turn. I suppose I will get the other ladies of the Fierce Quilters Bee in on this action- Kitty, Allison, and Sarah. TELL ME STUFF, GUYS. :D

Thursday, July 31, 2014

At long last... A Clutch Tutorial!

OKAY! Guys. I did it. And I have new found respect for everyone who has every written a pattern or tutorial. It's a lot of work.

So without further ado... The Just the Essentials Clutch Tutorial!


Supplies:
A fat quarter or regular quarter yard of main (really you need a rectangle about 13x10.5 or two rectangles 6.5x10.5)
At least a fat quarter of lining fabric
Interfacing (I use Pellon SF101 for the inside and Pellon TP971F for the outside)
Narrow contrast strip for the wrist strap
Zipper at least 11" in length

Optional: D-ring and lobster clasp if you want the strap to be removable

FIRST. Cut your stuff!

2- 6.5" x 10.5" rectangles for the outside. These can be plain, patchwork, quilt as you go, appliqued, whatever you want! Get creative with it!
1- 6.25" x 10.25" piece for one lining wall
1- 8.5" x 10.25" piece for divider pocket
1- 13" x 10.25" piece for card slots
1- 2" x 14" piece for wrist strap OR TEST WRIST STRAP REMOVABLENESS

Interfacing:
TP971F (Thicker stuff):
2- 6.25 x 10.25 pieces for outside (I cut mine a little smaller than the outside to reduce a little bulk in the seams)
SF101 (Thinner stuff):
1- 6.25" x 10.25" piece for one lining wall
1- 8.5" x 10.25" piece for divider pocket
1- 13" x 10.25" piece for card slots
1- 2" x 14" piece for wrist strap

OKAY. Is everything cut out now? Good! Let's move on.

SECOND. Fuse your interfacing to your fabric pieces according to manufacturer's directions.

THIRD. Make your card slots.

1. Lay your 13 x 10.25 piece on your table and get out a ruler that is close in size to your piece. I like to use my 9.5" square.

2. Line the ruler up at 3" from the bottom on the wrong side.

just the essentials clutch tutorial step 2

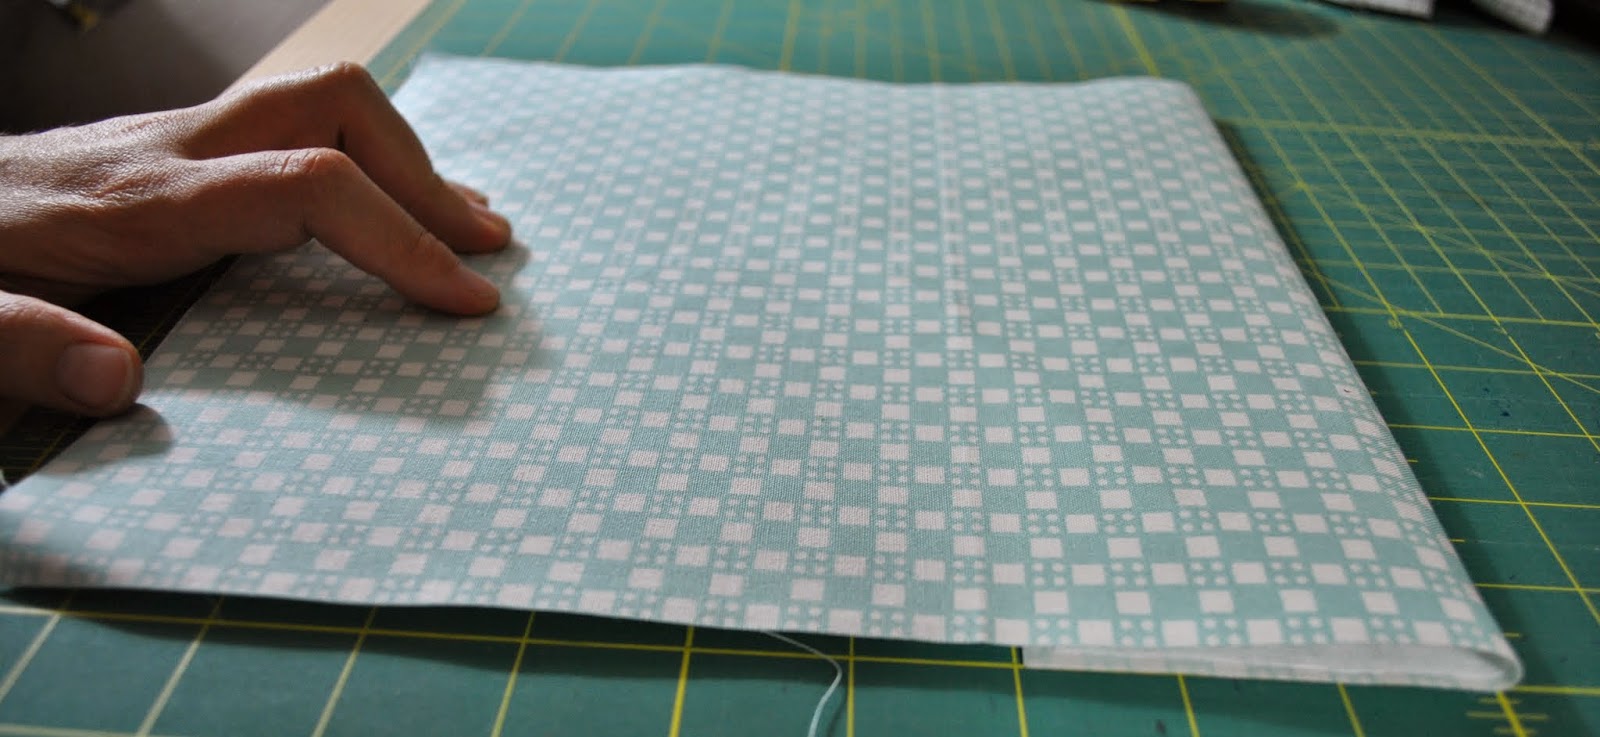
3. Fold the fabric over the ruler, making sure it's straight.

just the essentials clutch tutorial step 3

4. Slide the ruler out and finger press the fold. You can use clips or pins to old the fold if you like.

5.  Lay the ruler on top of the piece again, this time lining it up at 1.5" from the top of the fold.

just the essentials clutch tutorial step 5

6. Fold the fabric up over the ruler, making sure it's straight before sliding it out. Finger press the crease and pin/clip in place if you like.

just the essentials clutch tutorial step 6

7. Line up the ruler again (here is where having a slightly smaller ruler comes in handy, especially if you're using wonder clips!) at 2.5" from the fold. Make sure you're lining it up at the fold and not at the bottom!!

just the essentials clutch tutorial step 7

8. Fold the fabric down over the ruler and make sure it's straight before sliding it out and finger pressing the crease.

just the essentials clutch tutorial step 8

9. Are you ready! Last fold! Line up your ruler at 1.5" from the fold and fold the fabric up over the ruler. Finger press your crease and clip in place. After turning the piece over, it should look like this:

just the essentials clutch tutorial step 9

10. At this point you'll want to measure your piece and make sure it's 6.25" tall. Sometimes mine are spot on and sometimes they end up a little big. If it's a little big, you can trim off a little bit from the top or bottom to make it the right size.

11. Now you want to iron those folds so they're nice and crisp. Then top stitch them in place. Make sure you fold back the pockets so you're only sewing through each fold and not through all the layers! Otherwise you'll just sew your pockets shut and that's no fun! After top stitching, it looks like this (I know this picture is terrible. I'm not sure what happened! Please forgive me):

just the essentials clutch tutorial step 11

12. Now you can sew the lines to make the actual slots! YAY! First, mark the center line (should be 5 1/8" from the side). Then make 3.5" on either side of the center line. Make sure you are only marking the actual pockets because that's where you will sew. You don't need to sew all the way up (though I suppose you could if you wanted to). They are very faint in my picture... My pen was dying.

just the essentials clutch tutorial step 12

13. Now top stitch on those lines, being sure to reinforce the top of the pocket by backstitching. I usually leave my tails long on this side so I can pull them through to the back and knot them for extra security. When you're done it should look like this but less blurry (seriously, guys, I might get my fake photography license revoked for this):

just the essentials clutch tutorial step 13

YAY! Card slots are done!!

FOURTH. Make your divider pocket.

14. Fold your 8.5x10.25 piece in half and iron that crease. Then topstitch! That's it! Easy peasy.

just the essentials clutch tutorial step 14

See how nice the topstitching looks? :)

FIFTH. Make your strap.

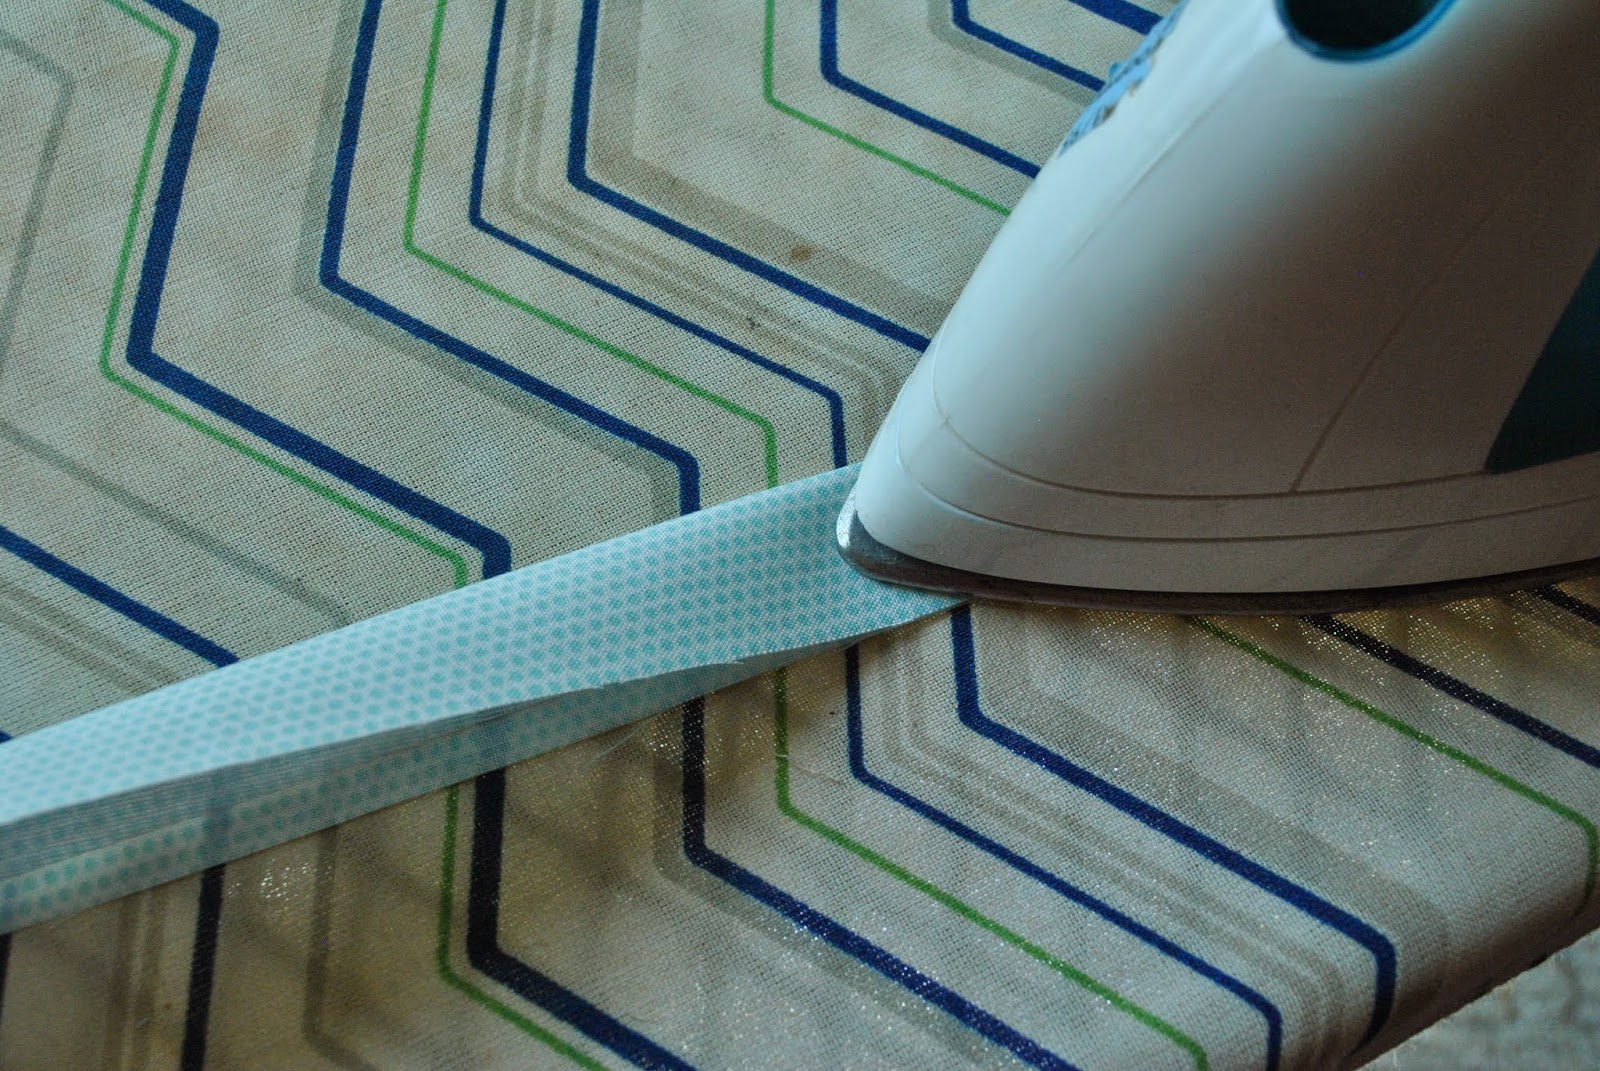
15. Fold your strap piece in half and iron it. Like you're making a quilt binding! I know my ironing board isn't much to look at...

just the essentials clutch tutorial step 15

16. Open it up and fold the two side in to meet at the center. Iron these, too.

just the essentials clutch tutorial step 16

17. Fold your creased strap piece in half so the raw edges are inside the fold. Then stitch the two folded edges together. I also like to add a line of stitching to the other side so it matches. It should look like this when you're finished:

just the essentials clutch tutorial step 17

YAY! All your pieces are ready to go! Now we can get to the really fun part!

SIXTH. Assemble your bag.

18. We're going to make a little sandwich. First, lay down your outside piece face up. Then lay the zipper on top of it face down. Line up those top edges!

just the essentials clutch tutorial step 18

19. Lay your lining piece down on top of the zipper, face down, lining up the top edges and centering the lining over the outside piece. Pin or clip in place!

just the essentials clutch tutorial step 19

20. Sew the layers together with about a 1/4" seam allowance. I like to use my walking foot for this. When you're done you'll have a nice little sandwich.

just the essentials clutch tutorial step 20

21. Fold the pieces back and press with your iron. Be careful not to melt your zipper!! Then you'll topstitch next to the zipper. Remember this picture? YAY TOPSTITCHING!

just the essentials clutch tutorial step 21

22. Okay, now we're going to do the same thing on the other side. BUT FIRST. Baste your divider pocket to your remaining lining piece along the bottom so you don't forget to add it in the final phase. Not that I have ever done that... ahem...

just the essentials clutch tutorial step 22

just the essentials clutch tutorial step 22

just the essentials clutch tutorial step 22

Yay! Almost there!

23. Now we are going to sew it all together! First, pin or clip your strap in place. I like to put mine a couple of inches down from the zipper. I don't usually measure. But I like it above the middle for sure. I also leave a little sticking out so that I can easily see where it is while I'm sewing so I'm not surprised by the bulk!

just the essentials clutch tutorial step 23

24. Now fold your outer pieces together and line them up so they are right sides together. Do the same with your lining pieces. It should look like this:

just the essentials clutch tutorial step 24

25. At this point, you will want to make sure you unzip your zipper about 3/4 of the way. Add a copious amount of clips or pins. Make sure your zipper is folded with the teeth facing the lining. This will make sure your corners are neat and tidy.

just the essentials clutch tutorial step 25

26. I'm sorry. I failed to get a picture of this step because I was so excited about getting it done! But now you will sew all around the outside of your bag, leaving a few inches in the bottom of the lining for turning. I like to go over the strap at least twice for security.

27. Seriously failing at pictures. Now you can clip off the extra bits of zipper ends and strap ends, clip your corners a little to reduce bulk, and turn your bag right side out! It's basically done! All you have to do now is sew the hole in the lining closed (I do it by hand with a ladder stitch).

WOW. Done! Aren't you proud?? You should be! HIGH FIVE!


If you make a bag, I'd love to see pictures! Just shoot me an email or tag me on Instagram (@crookedbanana). Let me know if you have any trouble with the tutorial or if you see any mistakes! My eyes are going all funny and crossed from staring at it so much.

Friday, July 25, 2014

Finished: Circular Knitting Needle Case

Hiiiiiii!

So. Here I am again. Without a tutorial, but WITH something pretty cool to show you! I have been knitting a lot lately and my collection of needles has been growing. Particularly since I decided to buy an interchangeable circular needle set from Knit Picks. Up until now, those needles have had various homes around the house... sometimes at the bottom of my project bag, stuffed into a drawer full of sewing notions, stuck inside bins full of yarn. You get the idea. I just stashed them where ever I found space. BUT NO LONGER.

circular knitting needle roll case front

BECAUSE NOW I HAVE THIS. It's a little roll up case to house all my needles! :D It isn't perfect, of course. This was my first attempt, and true to fashion, I decided not to follow a pattern. I knew the general shape I wanted and just decided to figure out the math myself... Well. My math isn't perfect yet. I put the magnetic snap in slightly wrong (okay, I was about an inch off with one of them, it's kind of a lot), which it why the bottom edge of the flap is curling a bit. I kind of have to strain to close it...

circular knitting needle roll case

The back has a little zippy pocket to put my stitch markers and cabling needles and whatnot in. Not that I have used any of my cabling needles so far. But I have them for the next time I feel brave! I'm not totally happy with how it turned out. I don't like how much of the lining fabric you can see. But next time will be better!

circular knitting needle roll case inside


The inside has 15 pockets. These aren't all my needles, by the way. I haven't yet gathered them all together. These are just the ones that had been lurking in my sewing notions drawer. In the next version I will change a couple of things about this. FIRST. I will make an even number of pocket rows so it more happily folds into thirds. That was a huuuuuge oversight! SECOND. I won't make the taller two rows of pockets end all the way at the bottom of the bag. That seam is super bulky. And even my biggest needles get almost swallowed by the top pockets.

So. Is it perfect? No. But do I love it? YES. I'm so proud of myself for figuring this out and making it functional! I learned a lot from this little bag and my next version will be waaaay better.

What have you been working on? Linking up to Finish it Up Friday at Crazy Mom Quilts!

Friday, June 20, 2014

Working through the Stress

In the interest of getting back into this whole blogging thing... Here is something I actually managed to finish during all this craziness. It hasn't been a productive few weeks, but the sewing I did manage was so calming! I really appreciated having a hobby that could take my mind off things for a while.

Without further ado...

just the essentials clutch exterior paper pieced star


I love how the orange and grey turned out together. The little star is paper pieced from a pattern I drew up myself. I feel like I put the strap on the wrong side, though. Is there a right side for a wrist strap?

Designing this was good therapy. I again added card slots to the inside and a pocket for a phone or cash. This one is a little different inside than the others. The others had the card slots built into the side. This one has them built into the pocket, if that makes sense. I know this photo isn't much help because it looks like there's just six card slots. But the top one is actually one whole pocket.

just the essentials clutch interior

Would anyone be interested in a little tutorial for these? And also, where do you think is better for the card slots- built into one side of the pouch or on the front of the cash/phone pocket?

What have you been working on this week? Linking up to Finish it Up Friday at Crazy Mom Quilts!

Monday, May 26, 2014

Making Clutches

Hello all! How was your long weekend? Mine was filled with family and friends and food. But I also managed to get some sewing time in. I have been wanting a little clutch to take out with me so I don't have to lug my whole purse around, but still have all the essentials. I couldn't find one I liked, so I decided to design one.

This was my first attempt:

just the essentials version 1 bow exterior

It was okay. I like the bow, but it seemed like it could be a little wider.

just the essentials version 1 interior

And for the inside, I knew I wanted card slots so I wouldn't need a wallet and a pocket for my phone so it doesn't get all scratched up by my keys. It was sort of successful. Everything worked, but the opening was too narrow to easily get the cards in and out and things were just generally a little cramped. Which led me to version 2:

just the essentials clutch patchwork exterior

Ooh, those reds look crazy, don't they? They aren't that crazy, promise. But anyway! In this version, I kept the height but widened it two inches. Then I got rid of the bow and went for patchwork instead. And added a wrist strap. I also used the tutorial by Michelle Patterns for hand finishing the zipper corners so they wouldn't look all smashed in. Kind of a pain, but really worth the result I think!

just the essentials clutch interior

This was a much better size! It fits all my essential stuff: phone, keys, cards, maybe a hair tie and my little portable brush/mirror. The cards slide out nice and easy in this version, but don't come out while you're just walking around. It's perfect! Since it is for "just the essentials," that's what I shall call it. The Just the Essentials Clutch.

just the essentials clutch prototypes

Not bad for a few hours' work!

I might have to make a couple more of these. I'm thinking maybe one for work to replace my current pouch that has no interior pockets. Such a handy little clutch!

Linking up at the very last second to Sewjo Saturday with Kim at My Go-Go Life!

Friday, March 28, 2014

Finished Purse!

I have been a project-finishing MACHINE. Seriously. Last weekend, I made a purse! And I have another quilt top to show you. But it will have to wait until there's enough daylight for pictures :)

But look! Purse!

sew sweetness accordion bag qayg

It's the accordion bag pattern from Sew Sweetness that I got in my Pattern Parcel. Except instead of making the front flap accordion-like, I made it a quilt as you go panel. First time I've ever done QAYG, but I really love the results!

sew sweetness accordion bag lining

I used some fun, happy dots for the inside.

sew sweetness accordion bag qayg flap

My old bag was looking so sad. I'm so glad I finally took the time to make a new one :)

Linking up to TGIFF, hosted this week at Devoted Quilter!

Friday, June 28, 2013

Starts and Finishes

Let's do finishes first, shall we?

I has been a busy week. I'm pretty surprised I got anything done! But the boyfriend had an exhausting couple of days and went to bed super early, so I had time to sneak back to my sewing room and get stuff done!

First up: this month's bee block (finally!). The queen this month wanted Christmas themed scrappy trip blocks. Here's mine:

christmas scrappy trip around the world block

Some of them aren't Christmas fabrics, but I think I covered my bases as far as colors go, at least! This little block is on its way to Australia! I had never sent anything internationally before and looked like a total n00b at the post office, but I was excited, anyway :) I hope it doesn't take too terribly long to get there!

Next up: PRETTINESS.

wonky star tote

I really needed a bigger bag to take with me to work. I was getting really sick of carrying two- my purse and my lunch bag (that was usually just stuffed full of yarn). This one carries everything I need AND it's pretty. :D What more could a girl ask for??

wonky star tote

I didn't follow a pattern. I used what I knew of bag construction to make something to fit my needs. The front and back panels measured 16.5" unfinished and I boxed the corners by about 3". I sewed a zipper pocket into the lining and did a much better job than I did on my Velocity Girl bag! Super proud of myself for that. But I do wish I'd had something other than a red zipper... I also added a magnetic snap closure. I wanted to do a recessed zipper, but I wanted to get it done without going to the store more, so I revised my plan.

wonky star tote- inside

Here it is all stuffed with crap! This is without my yarn and my lunch. It gets pretty full with everything in it, but not uncomfortably so. It's juuuuust right. It turned out even better than I thought it would! And it was a good opportunity to practice my FMQ loops. I think they're getting a lot more consistent :) Must try new designs soon! I absolutely LOVE this bag!

Okay. Now, are you wondering what I started? Well I can tell you, it is REALLY EXCITING.

fabric explosion

My sewing room EXPLODED as soon as I heard about this:

FairyFace Designs

Yup, that's right! That huge mess up there will eventually be my very own SWOOOOON! AH! I love this pattern so much! As soon as I saw this, I bought the pattern and started going through my stash to see what I could do. Because I am broke (yay student loan repayment!) this really needed to come mostly from my stash. I sorted and sketched and mocked things up with the Quilt Design Tool and did a whole lot of math and! I can totally do it. I am going to use my precious Daiwabo elephant prints and a variety of solids to create... THE ELEPHANT SWOON. It has taken all my willpower to be responsible and do things like fill out loan consolidation paperwork and sleep instead of just working on this all the time... but soon it will be the weekend. And then (as soon as I finish the last of my stitch and flip blocks) it will be swoon time! YAY! So what do you say, wanna Swoon with me?? Click the button above for details!

So that's been my week. How has yours been?

Linking up with Crazy Mom Quilts for Finish it Up Friday!

And don't forget- these are the hoppers posting this week for the Let's Get Acquainted 2013 blog hop:

Green @ So Sew Green

Gwendellyn @ The Rainbow Revolts

Jessica @ Stitched In Thyme


Kathy @ Kayak Quilting

Michelle @ Factotum Of Arts


Kris @ Sew Sunshine

Camilla @ Faffling

Go check them out!